
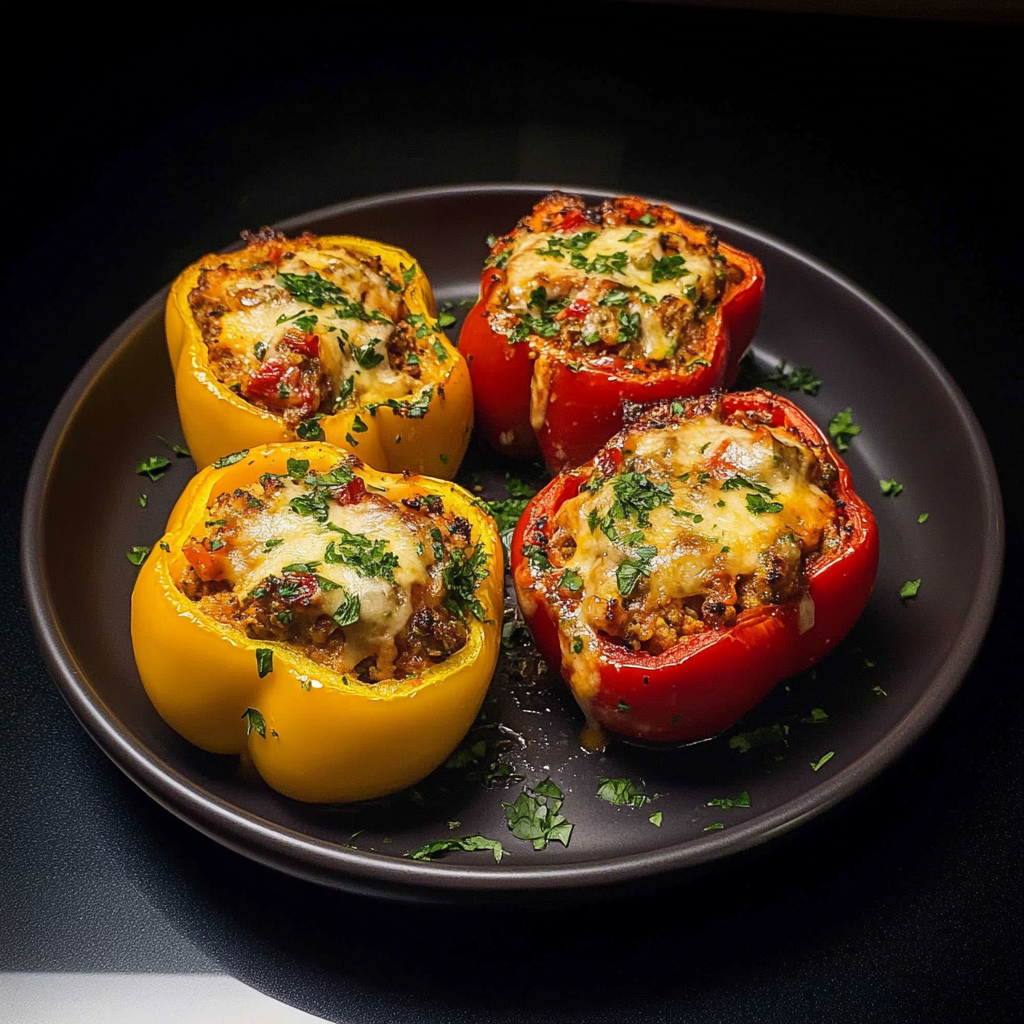
Imagine biting into a vibrant, juicy bell pepper bursting with a medley of flavors, where savory ground meat meets zesty spices, all wrapped in that tender, colorful shell. The aroma wafts through your kitchen like a friendly hug, inviting everyone to gather around the table as if it were a holiday feast. pair it with chili This is not just any meal; this is Instant Pot Stuffed Bell Peppers, your new dinner hero that promises to make every weeknight feel like an occasion.
Now, let’s be real: who doesn’t want to impress their family or friends with a dish that looks like it took hours to prepare but actually comes together in a breeze? As you pop open that Instant Pot and unveil these beauties, watch as eyes widen and mouths water. Perfect for busy weeknights or cozy Sunday dinners, these stuffed peppers are not just tasty—they’re also ridiculously easy to make. Trust me; you’ll want to keep this recipe close at hand for those moments when you need a little culinary magic! For more inspiration, check out this Cozy Cabbage Soup recipe.
Why You'll Love This Recipe
- Preparing these Instant Pot Stuffed Bell Peppers is incredibly simple, making it ideal for busy nights.
- The flavor profile is a delightful mix of savory and spicy, pleasing even the pickiest eaters.
- Their visually stunning presentation adds color and excitement to your dinner table.
- Versatile enough to customize based on ingredients at hand or dietary preferences.
Ingredients for Instant Pot Stuffed Bell Peppers
Here’s what you’ll need to make this delicious dish:
- Bell Peppers: Choose firm, colorful peppers—red, yellow, or green—for vibrant flavor and visual appeal.
- Ground Meat: Ground beef works great here, but feel free to substitute turkey or plant-based options for a healthier twist.
- Rice: Uncooked long-grain rice provides the perfect texture; brown rice is a healthy alternative that adds nuttiness.
- Onion: A medium onion adds depth and sweetness; finely chop it for better distribution throughout the filling.
- Tomato Sauce: Use your favorite brand or homemade sauce for extra flavor; it keeps everything moist and delicious.
For seasoning:
- Garlic Powder: This spice brings an aromatic kick; opt for fresh garlic if you prefer more intensity.
- Cumin: Adds warmth and earthiness; use ground cumin for a quick blend of flavors.
The full ingredients list, including measurements, is provided in the recipe card directly below.
How to Make Instant Pot Stuffed Bell Peppers
Follow these simple steps to prepare this delicious dish:
Step 1: Prepare the Peppers
Start by washing your bell peppers thoroughly. Slice off the tops (don’t toss them!) and scoop out the seeds inside with a spoon. Set them aside while you whip up that scrumptious filling.
Step 2: Sauté the Aromatics
Turn on your Instant Pot and select the sauté function. Add a splash of olive oil and toss in your chopped onion. Sauté until translucent—about three minutes—then add your ground meat. Brown it until fully cooked, breaking it apart with a spatula to ensure even cooking.
Step 3: Mix in Rice and Seasonings
Once the meat is cooked through, stir in uncooked rice along with the tomato sauce, garlic powder, cumin, salt, and pepper. Give everything a good mix until well combined. Your kitchen will start smelling amazing about now!
Step 4: Fill Those Peppers
Carefully spoon your delicious filling into each prepared bell pepper until they are generously packed. Don’t forget those tops you set aside earlier—chop them up and sprinkle on top of your filled peppers for added flavor.
Step 5: Pressure Cook
Add one cup of water to the bottom of your Instant Pot (this helps create steam). Place the filled peppers upright on the trivet inside the pot. Close the lid securely and set it to pressure cook on high for about eight minutes.
Step 6: Serve with Style
When time’s up, allow for natural pressure release for five minutes before switching to quick release. Carefully remove those hot peppers from the pot! Transfer them onto plates and drizzle some extra tomato sauce over top if desired—a perfect finishing touch!
These Instant Pot Stuffed Bell Peppers are bound to become a family favorite! Serve them alongside crusty bread or fresh salad for an unforgettable meal experience. Now go ahead and enjoy every colorful bite!
You Must Know
- This delightful Instant Pot Stuffed Bell Peppers recipe combines convenience with mouthwatering flavors.
- You can easily adjust the stuffing based on your pantry staples.
- Colorful peppers make every plate eye-catching, perfect for impressing guests or simply satisfying your own cravings.
Perfecting the Cooking Process
To achieve perfectly cooked stuffed bell peppers, start by sautéing the filling ingredients in the Instant Pot. Then, stuff the peppers and cook them under pressure for about 10 minutes. This order ensures that everything is infused with flavor and cooked to perfection.
Add Your Touch
Feel free to customize your stuffed bell peppers! Swap out ground beef for turkey or add black beans for a vegetarian option. Experiment with different spices like cumin or paprika to give it your signature twist.
Storing & Reheating
Store leftover stuffed bell peppers in an airtight container in the fridge for up to three days. To reheat, pop them in the microwave for a few minutes or warm them up in the oven at 350°F until heated through.
Chef's Helpful Tips
- For perfectly stuffed bell peppers, ensure they are fresh and firm, avoiding any blemishes.
- Pre-cook rice or grains slightly to prevent sogginess during pressure cooking.
- Lastly, allow natural pressure release for better texture and flavor retention.
I once made these Instant Pot Stuffed Bell Peppers for a family gathering, and they vanished faster than you could say “delicious.” My cousin even asked if I had secretly enrolled in cooking school! delicious creamy mashed potatoes.
FAQs :
What are the best types of bell peppers for stuffing?
When making Instant Pot stuffed bell peppers, choose bell peppers that are firm and fresh. Popular choices include red, yellow, and green bell peppers. Red peppers provide a sweeter flavor, while green ones add a slight bitterness. Make sure to select medium-sized peppers that can hold the stuffing well. You can also opt for mini bell peppers if you prefer smaller portions or a colorful platter. Experiment with different varieties to find your favorite!
Can I prepare stuffed bell peppers ahead of time?
Yes, you can prepare Instant Pot stuffed bell peppers ahead of time. Simply assemble the filling and stuff the peppers. Store them in an airtight container in the refrigerator for up to 24 hours before cooking. This makes for a quick dinner option! If you’re short on time during the week, preparing them in advance can save you effort on busy days.
What variations can I make to the stuffing mixture?
You can customize your stuffing mixture for Instant Pot stuffed bell peppers easily. Try using quinoa or brown rice instead of traditional white rice for added nutrition. Incorporate black beans, corn, or diced tomatoes for extra flavor and texture. Veggie lovers may want to add chopped spinach or mushrooms. For protein options, consider ground turkey, beef, or even tofu for a vegetarian alternative.
How do I store leftovers from stuffed bell peppers?
To store leftovers from your Instant Pot stuffed bell peppers, let them cool down completely before refrigerating. Place them in an airtight container and keep them in the fridge for up to three days. They can also be frozen for longer storage; just wrap each pepper individually in plastic wrap and then place them in a freezer-safe bag or container. Reheat leftovers in the microwave or oven until warmed through.
Conclusion for Instant Pot Stuffed Bell Peppers :
In summary, Instant Pot stuffed bell peppers are an easy and versatile dish to prepare. You can fill them with various ingredients to suit your taste preferences while enjoying their vibrant colors and flavors. Preparing them ahead of time saves effort on busy evenings, and they store well for leftovers too. With these tips and variations, you’ll surely enjoy this delicious meal with family and friends!
Instant Pot Stuffed Bell Peppers

Instant Pot Stuffed Bell Peppers are a vibrant and flavorful meal that effortlessly elevates your weeknight dinners. Bursting with savory ground meat, zesty spices, and tender bell peppers, this easy-to-make dish impresses family and friends alike. Ready in under 30 minutes, these stuffed peppers are perfect for busy evenings or cozy gatherings, making them a must-try culinary delight.
- Prep Time: 15 minutes
- Cook Time: 15 minutes
- Total Time: 30 minutes
- Yield: Serves 4
- Category: Main
- Method: Pressure Cooking
- Cuisine: American
Ingredients
- 4 large bell peppers (red, yellow, or green)
- 1 lb ground beef (or turkey)
- 1 cup uncooked long-grain rice (or brown rice)
- 1 medium onion, finely chopped
- 1 cup tomato sauce
- 2 tsp garlic powder
- 1 tsp cumin
- Salt and pepper to taste
- 1 cup water
Instructions
- Wash the bell peppers, slice off the tops, and remove the seeds.
- Set the Instant Pot to sauté mode. Add olive oil and sauté the chopped onion for about 3 minutes until translucent.
- Add ground meat and cook until browned, breaking it apart with a spatula.
- Stir in uncooked rice, tomato sauce, garlic powder, cumin, salt, and pepper until well combined.
- Fill each pepper with the mixture; use reserved tops as optional garnish.
- Place filled peppers upright on the trivet in the Instant Pot with 1 cup of water at the bottom.
- Close the lid and set to pressure cook on high for 8 minutes.
- Allow natural pressure release for 5 minutes; then perform quick release.
- Serve hot with extra tomato sauce if desired.
Nutrition
- Serving Size: 1 stuffed bell pepper (approximately 300g)
- Calories: 350
- Sugar: 6g
- Sodium: 620mg
- Fat: 14g
- Saturated Fat: 6g
- Unsaturated Fat: 7g
- Trans Fat: 0g
- Carbohydrates: 36g
- Fiber: 4g
- Protein: 22g
- Cholesterol: 70mg
Keywords: - Customize filling by swapping ground beef for turkey or adding black beans for a vegetarian option. - Experiment with different spices like paprika or chili powder for added flavor. - Store leftovers in an airtight container for up to three days.

Leave a Comment